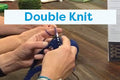
I-Cords are often created as the handles of bags, or as decorative trim. Although seemingly confusing at first, they are actually quite simple to create... and are also speedy.
You'll need 2 double pointed needles. Your pattern should specify the size.
Cast on the number of stitches instructed by your pattern. For our example, we'll cast on 4 stitches. Here's the concept: you are always going to knit the same stitch first... and the same stitch last. After you knit the 4 stitches, you move them to the opposite end of the dpn and then knit them again in the same order. But let's take it one step at a time:
1. Cast 4 stitches onto one of the double pointed needles (dpn).
2. Using the other dpn, knit those 4 stitches.
3. Slip those 4 stitches to the opposite end of the needle you just used.
4. Using the other needle & the yarn attached to the last stitch, knit the 4 stitches.
5. Repeat the above 2 steps until you achieve the desired length. Bind off.


Repeat these 2 steps...


We even have a video tutorial to help you out. We hope you enjoy it!